Setting up a PXE boot server on CentOS 7
PXE (Preboot eXecution Environment) is a means to completely install an Operating System on a host via the network, without the need for DVDs or install USBs. This is a pretty popular mechanism for setting up hosts, because it scales quite well and, if done properly, can be done remotely.
In this guide, I’ll be detailing how you can set up a PXE server to serve BIOS-based clients on CentOS 7. For the purposes of this guide, I’m going to assume you have a clean CentOS 7 install, with SELinux and firewalld enabled. This guide also assumes that you already have a DHCP server configured and enabled on your network (as was the case in my environment). In addition, I will also be doing this entire process as the root user, and configuring this server to deliver CentOS 7 Minimal.
1. Installing the required packages.⌗
This step is pretty simple: we just need to install a few packages using yum. Make sure that you’ve updated yum’s package catalog before you start.
# yum -y install tftp tftp-server syslinux xinetd httpd wget
2. Configuring the TFTP server⌗
In order to install software on a remote host, we need to deliver some bootfiles to be executed on the remote host. We can do this by means of a TFTP (Trivial File Transfer Protocol) server.
To configure our TFTP server, we’re going to create a configuration file at /etc/xinetd.d/tftp. Then, we can edit this file in our favourite text editor (I prefer nano).
# touch /etc/xinetd.d/tftp
# nano /etc/xinetd.d/tftp
We want to add the following to our file:
service tftp
{
	socket_type = dgram
	protocol    = udp
	wait        = yes
	user        = root
	server 	    = /usr/sbin/in.tftpd
	server_args = -s /var/lib/tftpboot
	disable     = no
 	per_source  = 11
 	cps         = 100 2
 	flags       = IPv4
}
There are four important things configured here:
-
user = root: The TFTP server will be run as the root user. If this is an issue, you’ll want to create a different user with the appropriate permissions and change this line. -
server_args = -s /var/lib/tftpboot: This will be the directory where we will store all of the files needed to boot a host. You can set this to another directory if you wish, so long as the user you have set above has read/write permissions for this directory. -
disable = no: This determines whether the server is running. Set this todisable = yesif you’d ever like to temporarily disable your TFTP server. -
flags = IPv4: ReplaceIPv4withIPv6if you use IPv6 addressing on your network. If you use both, set this line toflags = IPv4 IPv6.
3. Configure delivery of the OS installer⌗
We’re going to use an HTTP server to deliver the files for our operating system of choice. An FTP server can also be used for this purpose, but I’m going to be using HTTP in this example.
First off, we’re going to make a directory for our CentOS 7 installation files.
# mkdir /var/www/centos7-minimal-1908
With a structure like this, it will be relatively easy to expand to other operating systems and versions in the future, by just adding a new path in under the /var/www/ directory.
Next, we need a CentOS 7 iso file. You can get these from any of the download mirrors listed on the CentOS website. At the time of writing, I got the minimal one of these using the following command:
# wget http://mirror.1000mbps.com/centos/7.7.1908/isos/x86_64/CentOS-7-x86_64-Minimal-1908.iso -O /tmp/centos7-minimal-1908.iso
I’m using the minimal ISO to save space on my PXE server, but you can use the full 4.3GB DVD ISO if you want or need to.
Now, we’re going to mount that iso file, copy its contents to our HTTP server, and set the correct permissions for the folder. The copying part might take a while, depending on the specifications of your host.
# mount -o loop /tmp/centos7-minimal-1908.iso /mnt
# cp -a /mnt/* /var/www/centos7-minimal-1908/
# chmod -R 644 /var/www/centos7-minimal-1908/
As a final touch, we’re just going to make sure that Apache serves this directory up properly by creating a configuration file for it.
# touch /etc/httpd/conf.d/pxe.conf
# nano /etc/httpd/conf.d/pxe.conf
Then, we should add the following to that configuration file:
Alias /centos7-minimal-1908 /var/www/centos7-minimal-1908/

<Directory /var/www/centos7-minimal-1908/>
Options Indexes FollowSymLinks
Order Deny,Allow
Allow from all
</Directory>
4. Copy network-boot related files to the TFTP directory⌗
Included with syslinux are some files we need to perform a network boot. We can copy these to our tftpboot directory with a simple cp:
# cp -a /usr/share/syslinux/* /var/lib/tftpboot/
5. Copy CentOS-specific files to our TFTP server⌗
On our mounted iso file, there are some files specific to our desired CentOS 7 installation that we need to copy to our TFTP server. We should create a folder for these files to go in in /var/lib/tftpboot, and copy these files into there.
# mkdir /var/lib/tftpboot/centos7-minimal-1908
# cp /mnt/images/pxeboot/vmlinuz  /var/lib/tftpboot/centos7-minimal-1908/
# cp /mnt/images/pxeboot/initrd.img  /var/lib/tftpboot/centos7-minimal-1908/
6. Configure PXE server behaviour⌗
The PXE server reads its configuration from files kept in /var/lib/tftpboot/pxelinux.cfg/. Because of this, we’re going to create that folder and a default configuration to go with it.
# mkdir /var/lib/tftpboot/pxelinux.cfg
# nano /var/lib/tftpboot/pxelinux.cfg/default
You’re going to want your configuration file to look a bit like this:
default menu.c32
prompt 0
timeout 300
ONTIMEOUT 1

menu title ########## PXE Boot Menu ##########

label 1
menu label ^1) Install CentOS 7 Minimal 1908
menu default
kernel centos7-minimal-1908/vmlinuz
append initrd=centos7-minimal-1908/initrd.img method=http://pxe.home.local/centos7-minimal-1908 devfs=nomount

label 2
menu label ^2) Boot from system drive
localboot 0
You might have to adjust the hostname given in the method line to the hostname of your PXE server, or its IP address.
The configuration file above will by default boot via PXE. At the moment, this is fine, but this is something to be aware of when we start using the kickstart script to perform an unattended install. With Kickstart, it is possible to inadvertently boot from the PXE server and automatically install CentOS over your current operating system if PXE is the first boot option on your machine.
7. Configure your DHCP server⌗
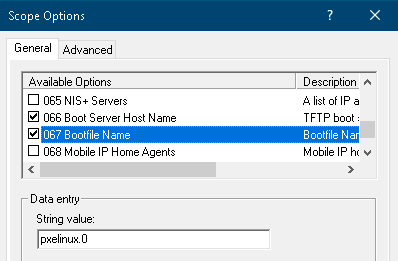
I’m using Windows Server for my DHCP server, which only requirees you to set two extra options for your scope. First, we set option 66 to the IP address or hostname of your PXE server, so that the client can query the correct server. Then, by setting option 67 to pxelinux.0, we let PXE clients know which file to use to boot from.
8. Enable services and test⌗
Now all we need to do is add exceptions in the CentOS firewall for our outgoing services, start those services running, and set them to start when the host boots.
# firewall-cmd --permanent --add-service={http,tftp}
# firewall-cmd --reload

# systemctl start httpd
# systemctl enable httpd
# systemctl start xinetd
# systemctl enable xinetd
In the above snippet, we allow the http and tftp services to listen on their default ports.
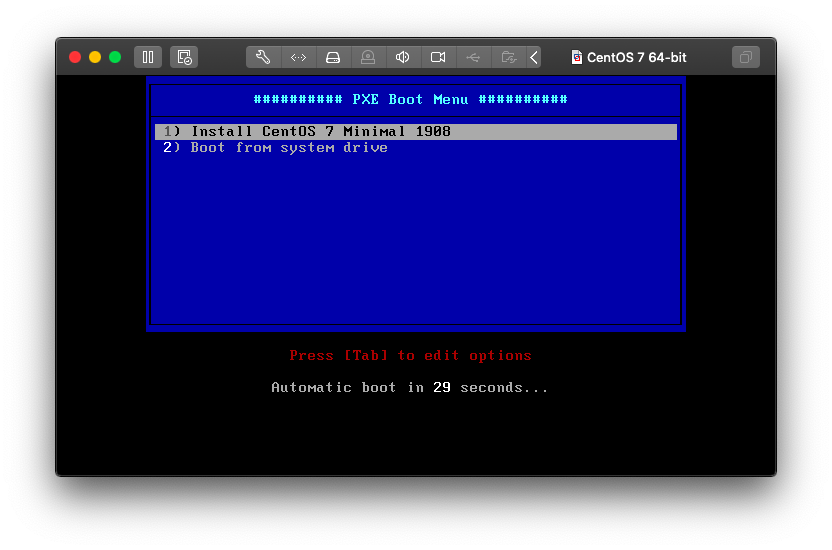
Now, if perform a PXE boot on another (virtual) machine, we will see that it boots straight to our boot menu!
Note: You may find that 1024MB of RAM is not enough to perform a PXE boot without errors. Because the CentOS installer is stored in RAM, you need to have at least 2048MB of RAM on the target host at install time. You can always decrease this again after the install.
9. Configure Kickstart (Optional)⌗
CentOS 7 ships with a pretty useful tool for unattended installations: Kickstart.
Kickstart takes a configuration file that you write, and uses it to configure your CentOS host, just like the configuration wizard does. You can configure a Kickstart file using Kickstart Configurator on the GNOME App Store, but this tutorial won’t cover that.
We’re instead going to be using the Kickstart file generated when you set up your PXE server, located under /root/anaconda-ks.cfg, as a base. Copy this file to your http directory to begin.
# cp /root/anaconda-ks.cfg /var/www/centos7-minimal-1908/ks.cfg
We’re now going to include this Kickstart file in our default PXE configuration for CentOS 7.
# nano /var/lib/tftpboot/pxelinux.cfg/default

default menu.c32
prompt 0
timeout 300
ONTIMEOUT 1

menu title ########## PXE Boot Menu ##########

label 1
menu label ^1) Install CentOS 7 Minimal 1908
menu default
kernel centos7-minimal-1908/vmlinuz
append initrd=centos7-minimal-1908/initrd.img method=http://pxe.home.local/centos7-minimal-1908 devfs=nomount inst.ks=http://pxe.home.local/centos7-minimal-1908/ks.cfg

label 2
menu label ^2) Boot from system drive
localboot 0
You’ll notice that we added inst.ks=http://pxe.home.local/centos7-minimal-1908/ks.cfg to the end of the line beginning with append. This will tell our PXE client that it is expected to use Kickstart for configuration, and where to find the configuration file to be used.
With the configuration file we have now, if we were to PXE boot a host we would get a host configured exactly the same way that our current PXE server was configured. We can, however, modify our Kickstart configuration and change what our default PXE client will look like once configuration has finished.
I’m not going to cover a complete Kickstart configuration, because it is a very powerful tool with a lot of configuration options. However, we will gloss over some of the more basic ones.
You’ll want to change the cdrom line to url --url http://pxe.home.local/centos7-minimal-1908, to reflect that you are installing from your CentOS 7 install tree (Fill in your own hostnames where necessary).
You’ll also want to change the graphical line to cmdline if you don’t want to use a graphical install (by default, CentOS shows an install wizard during install. With graphical enabled, this will still be shown). Bear in mind that if any user input is required during a cmdline install (for example, during post-install tasks), then the installation will halt.
You can also change firstboot --enable to firstboot --disable to disable first-time boot setup. It may be useful to leave this enabled for GUI machines, as it allows you to set the keyboard layout, region and time zone (among other things), but for a headless VM/server these are things we can configure in the Kickstart file if necessary.
Under the Network Information heading we can see configuration options for the hostname and network adapter of the host.
# Network information
network  --bootproto=dhcp --device=link --onboot=on --ipv6=auto
network  --hostname=centos.test.home.local
The next most important setting is the rootpw setting. We can set the password for the root user by changing this string. In order to generate a new encrypted password string to insert here, simply run the following command, where hunter2 is your desired password.
# openssl passwd -1 hunter2
$1$F38EHyKI$p.q1ftU2TVGUiUxmTVTKu.
You can then copy the resulting string into your Kickstart file, so that the line reads:
rootpw --iscrypted $1$F38EHyKI$p.q1ftU2TVGUiUxmTVTKu.
Lastly, we have the section labelled %packages. Here we can specify which packages are installed by YUM after CentOS is installed. Within this section, we have the @^minimal installation environment and @core package group, both of which constitute the minimum package installation for CentOS to run. We could remove @core, as it is installed by default regardless of whether it is listed here or not. We should also define a base repository to use to find these packages; we can do this by adding the following line above the packages heading:
repo --name=a-base --baseurl=http://mirror.centos.org/centos/7/os/x86_64/
Underneath these two lines, you can specify one package name per line. In my case, it would be convenient to add nano, wget and git to this section, as these are applications that I use frequently. The result of adding these would look like this:
%packages
@^minimal
@core
chrony
kexec-tools
git
wget
nano

%end
It is important to not delete the %end tag of the %packages block, otherwise the syntax of your Kickstart file will not be correct, and installation will not proceed.
For more information about CentOS Kickstart commands, the CentOS documentation is a fantastic resource.
Now, when we select the CentOS 7 boot option in our PXE boot screen, the install will commence and complete! Once the installation is completed, the host will reboot and boot into CentOS for the first time.


The Kickstart file we worked on above is available here.
Suggestions? Questions? Send me an email.